

Exploring Layout Managers in Android: Constraint, Linear, and Relative Layouts with a Simple UI…


<?xml version="1.0" encoding="utf-8"?>
<androidx.constraintlayout.widget.ConstraintLayout
xmlns:android="http://schemas.android.com/apk/res/android"
xmlns:app="http://schemas.android.com/apk/res-auto"
android:layout_width="match_parent"
android:layout_height="match_parent">


<TextView
android:id="@+id/textView"
android:layout_width="wrap_content"
android:layout_height="wrap_content"
android:text="Hello, World!"
app:layout_constraintTop_toTopOf="parent"
app:layout_constraintStart_toStartOf="parent"
app:layout_constraintEnd_toEndOf="parent"/>


<ImageView
android:id="@+id/imageView"
android:layout_width="wrap_content"
android:layout_height="wrap_content"
android:src="@drawable/ic_launcher_foreground"
app:layout_constraintTop_toBottomOf="@id/textView"
app:layout_constraintStart_toStartOf="parent"
app:layout_constraintEnd_toEndOf="parent"/>


<Button
android:id="@+id/button"
android:layout_width="wrap_content"
android:layout_height="wrap_content"
android:text="Click Me"
app:layout_constraintBottom_toBottomOf="parent"
app:layout_constraintStart_toStartOf="parent"
app:layout_constraintEnd_toEndOf="parent"/>


</androidx.constraintlayout.widget.ConstraintLayout>
Now let’s move on to Linear Layout. Here’s how you can build the same UI using Linear Layout:
<?xml version=”1.0" encoding=”utf-8"?>
<LinearLayout
xmlns:android="http://schemas.android.com/apk/res/android"
android:orientation="vertical"
android:layout_width="match_parent"
android:layout_height="match_parent">
<TextView
android:id="@+id/textView"
android:layout_width="wrap_content"
android:layout_height="wrap_content"
android:text="Hello, World!"/>

<ImageView
android:id="@+id/imageView"
android:layout_width="wrap_content"
android:layout_height="wrap_content"
android:src="@drawable/ic_launcher_foreground"/>

<Button
android:id="@+id/button"
android:layout_width="wrap_content"
android:layout_height="wrap_content"
android:text="Click Me"/>

</LinearLayout>
Finally, let’s look at how to build the same UI using Relative Layout:
<?xml version=”1.0" encoding=”utf-8"?>
RelativeLayout
  xmlns:android="http://schemas.android.com/apk/res/android"
  android:layout_width="match_parent"
  android:layout_height="match_parent">
<TextView
android:id="@+id/textView"
android:layout_width="wrap_content"
android:layout_height="wrap_content"
android:text="Hello, World!"
android:layout_alignParentTop="true"
android:layout_centerHorizontal="true"/>
<ImageView
android:id="@+id/imageView"
android:layout_width="wrap_content"
android:layout_height="wrap_content"
android:src="@drawable/ic_launcher_foreground"
android:layout_below="@id/textView"
android:layout_centerHorizontal="true"
android:layout_marginTop="16dp"/>

<Button
android:id="@+id/button"
android:layout_width="wrap_content"
android:layout_height="wrap_content"
android:text="Click Me"
android:layout_alignParentBottom="true"
android:layout_centerHorizontal="true"
android:layout_marginBottom="32dp"/>
</RelativeLayout>
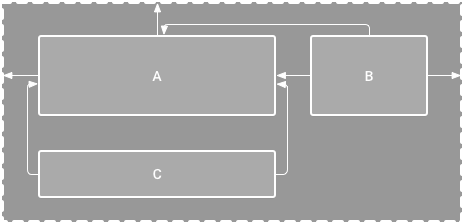
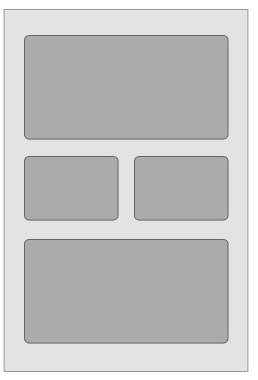
As you can see, all three layouts can be used to build the same UI, but they offer different advantages and disadvantages depending on the complexity of the UI design. Constraint Layout is best for complex UI designs, while Linear Layout is best for simple designs, and Relative Layout is great for designs that require relative positioning.
So, there you have it! Constraint, Linear, and Relative Layouts in Android, all with the same simple UI example. Hopefully, this has given you a better understanding of these layout managers and how they can be used in your own app development projects.
In conclusion, understanding the different layout managers available in Android is crucial for any app developer, as it allows for more efficient and effective creation of UI designs. Constraint Layout is best suited for complex UI designs, while Linear Layout is perfect for simple designs, and Relative Layout is great for designs that require relative positioning. By utilising the strengths of each layout manager, developers can create beautiful and functional UIs that enhance the user experience of their apps. Whether you’re a beginner or an experienced developer, knowing how to use these layouts will be essential in creating high-quality Android applications.
We at CaratLane are solving some of the most intriguing challenges to make our mark in the relatively uncharted omnichannel jewellery industry. If you are interested in tackling such obstacles, feel free to drop your updated resume/CV to careers@caratlane.com!

careerswpadmin 1 year ago
test
careerswpadmin 1 year ago
Need to fix UI
Leave a Reply