

In-house distribution of iOS apps using shell script.

By Praveen Apk- “ The architect of my life”

Apple supports wireless installation of in-house builds. With this feature, we can distribute our apps to our end users without uploading them to the App store. End users could be either the QE team, UX team, etc., Apps distributed using in-house distribution are code-signed and exported using Xcode.
Let’s first see the steps involved in iOS build sharing. It comprises 4 steps.
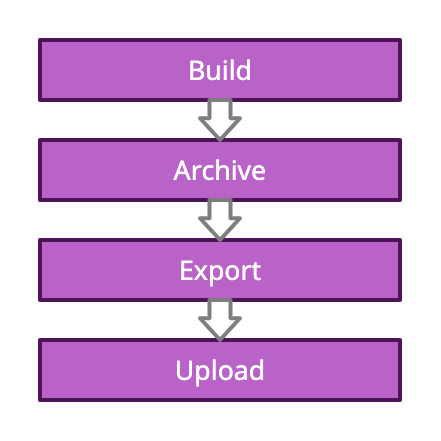
Step 1: Building the app (Project should run without any errors).
Step 2: Archiving the app.
Step 3: Exporting IPA file.
Step 4: Uploading to our SFTP server.
Step 1 and Step 2 are fairly simple as both can be done on Xcode with the click of a button from the menu bar.
Step 3 involves a series of steps as below
For Step 4, we are using Cyberduck as our FTP client. We would configure our SFTP server in Cyberduck. Once IPA is generated, we will upload it to our SFTP server. It’s just drag and drop in the Cyberduck tool.

Let’s see how we host a server for the distribution process. We are using an SFTP server for this purpose. In-house distribution requires three files to be hosted on our server.
A manifest file is a plist file that includes information about App URL, display image URL, and full-size image URL.
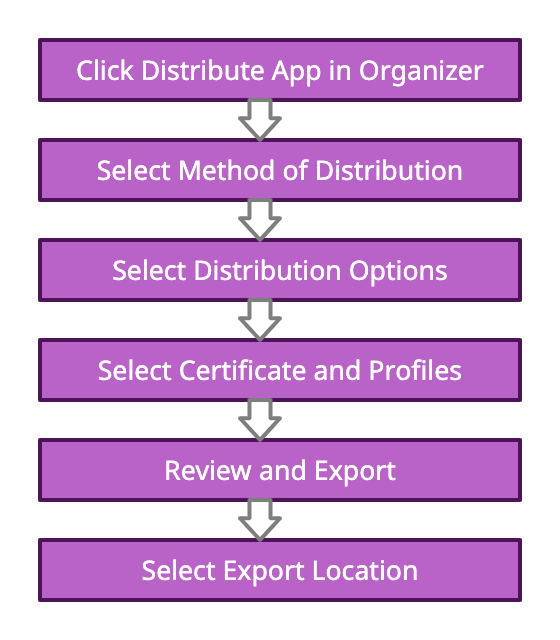
This file can be generated in Xcode as part of the export IPA. From Xcode’s Organizer window select the last archive built. Click on Distribute App and select Ad Hoc & click Next. In the second screen, click the checkbox next to Include manifest for over-the-air installation and click on Next.

Here, we will get an option to enter three URLs: App URL, display image URL, and full-size image URL.
App URL is where we will upload our exported IPA file.

After entering the above details continue exporting the IPA file. Once exported, the build folder will now include the manifest.plist file.

For our purpose, let’s rename the manifest.plist to CaratLane.plist. This file will be used in the HTML page we are creating.
We need a webpage with a download link. It’s a simple but complete webpage. It includes a link to download the build.

Instead of an HTTPS link, we will be using the itms-services scheme. It’s a custom scheme that iOS will understand and we are using download-manifest action & an URL which points to the manifest file which we created in the previous step.
The IPA file is our build which we exported using Xcode.
In this, step 1 and step 2 are one-time configurations. Once it is configured, every time we want to share a build, we have to generate it using Xcode and upload it using the Cyberduck tool.
Once the three files are ready, we will host them on our FTP server. We will give the path to the HTML file to our QA team members. For this we have to use the safari browser on our devices so that OS will understand the itms-services scheme.

Once we click on this link, we will be given a prompt. Selecting Install in the prompt will install the app on the device.

Since this is an ad-hoc build, we would be generating provisioning profiles with all our iOS test devices included. We can’t install it on other devices. So people who are having this link can install the app only if their device id is registered with our Apple developer portal.
So sharing a build manually consumes some of our time. Since Xcode is coming up with command-line tools, we can use a script to automate all the Xcode build steps.
Let’s see the steps involved.
Step 1: Change the directory to the iOS project repo path.
cd ~/Desktop/SFTP_Shell/CaratLane_iOS/ios-retail/ios-retail/CaratLane_Retail/Step 2: We internally share builds from qe branch. To make sure the local qe branch is up to date, pull the remote branch’s latest code.
git checkout qe
git pull origin qe
Step 3: Install all the pod dependencies. We use cocoapods as our dependency manager.
pod installStep 4: Build the project using xcodebuild command.
BUILD_SUCCESS=$(xcodebuild
-workspace CaratLane.xcworkspace
-scheme CaratLane
-sdk iphoneos
-destination 'generic/platform=iOS' build
| grep -w "\*\* BUILD SUCCEEDED \*\*")
This step does two things; The first is building the project using xcodebuild command and Second is grep for **BUILD SUCCEEDED** text in the output of the xcodebuild command.
If the Xcode build command succeeds BUILD_SUCCESS variable will have the text **BUILD SUCCEEDED**. If the build fails, it will have some other text.
We will check for string equality in the next step to detect if there is any error in the build process.
if [ "$BUILD_SUCCESS" == "** BUILD SUCCEEDED **" ]
then
// Archive the build
else
// Throw error and exit
fi
Step 5: Archive the build.
ARCHIVE_SUCCESS=$(xcodebuild
-workspace CaratLane.xcworkspace
-scheme CaratLane
-archivePath $BUILD_PATH/CaratLane.xcarchive
-destination 'generic/platform=iOS' archive
| grep -w "\*\* ARCHIVE SUCCEEDED \*\*")
Here also we are doing grep for ** ARCHIVE SUCCEEDED ** text. BUILD_PATH is a path declared as a constant in the script. This is where the archive file will be saved.
BUILD_PATH='~/Desktop/Build'Once archived, we will check for ARCHIVE_SUCCESS key for a successful archive.
if [ "$ARCHIVE_SUCCESS" == "** ARCHIVE SUCCEEDED **" ]
then
// Export the archive
else
// Throw error and exit
fi
Step 6: Export the archive using ExportOptions.plist file
EXPORT_SUCCESS=$(xcodebuild
-exportArchive
-archivePath $BUILD_PATH/CaratLane.xcarchive
-exportPath $BUILD_PATH
-exportOptionsPlist ~/Desktop/SFTP_Shell/ExportOptions.plist
| grep -w "\*\* EXPORT SUCCEEDED \*\*")
Here we are using ExportOptions.plist for archiving. We will get this file when we export IPA manually. Exported IPA file will be saved in the BUILD_PATH folder.

Once exported, we will check for EXPORT_SUCCESS key for successful export.
if [ "$EXPORT_SUCCESS" == "** EXPORT SUCCEEDED **" ]
then
// Upload the ipa
else
// Throw error and exit
fi
Step 7: Upload the IPA to the FTP server.
For uploading, we are using scp command. Here, scp stands for secure copy.
scp local_file_path {user_name}@{remote_address}:{remote_file_path}local_file_path is our IPA file. user_name is the username of the SFTP server. remote_address is the IP address of the SFTP server. remote_file_path is the path where we put our IPA file in the server.
Our SFTP server is secured with a password. When we use scp command to connect to our SFTP server, it will ask for the password. We can’t enter the password from our script. To overcome this, we will be using sshpass command.
sshpass command supports three options to pass the password.
Here we will be using a password file.
sshpass -f ~/Desktop/SFTP_Shell/pass_file scp CaratLane.ipa
{username}@{ip_address}:{remote_path}/CaratLane.ipa
Here the -f option mentions that we are using the password from a file.
Once the server is connected, scp command will upload the IPA to the mentioned path.
We can use the date command to calculate how much time the script took to run. Make note of start and end times in epoch format.
# Script starts
startTime=$(date +"%s")
# Build and upload process
..............
..............
..............
# Script ends
endTime=$(date +"%s")
# Calculate the difference
timeDiff=$(($endTime - $startTime))
minutesTook=$(($timeDiff / 60))
secondsTook=$(($timeDiff % 60))
echo "\nTook ${minutesTook} minutes and ${secondsTook} seconds to build
and upload ipa to server."nt the time it took to run.
diffTime will have the total number of seconds the script took to run. Once the script is done with execution it will print the time it took to run.

The full script can be found on the below gist.
https://gist.github.com/praveenApk/b798b6c21637a5b21a4812f47c60026a#file-ios_build-shNavigate to the path where the shell script resides. Just run sh iOS_SFTP.sh from the command line.
sh iOS_SFTP.sh
Once the upload is done, the script will exit.


We have seen how the in-house build distribution works and how we automated the same using the shell script. This script is in the initial stages of development and it can be improved further.
Thanks for reading.
Author
Editor
We at CaratLane are solving some of the most intriguing challenges to make our mark in the relatively uncharted omnichannel jewellery industry. If you are interested in tackling such obstacles, feel free to drop your updated resume/CV to careers@caratlane.com


Leave a Reply