banner image 1 banner image 2

Trim Video in ReactJS

September 15, 2022
4 mins
command
blog-img 1
Akanksha Yadav
Author

This article helps to trim off the video in a ReactJS application.

By Akanksha Yadav — A quick learner!


In some scenarios, when you upload a video on a web page, you want to trim the video for some specific start and end time on the client side before uploading the video to the server.

Trimming the video helps to keep the required content only. Here, we will use nouislider-react to get the start and end time from the video and ffmpeg to trim the video according to that time.

Imports used:

First off, create your React App.

Then we will be using the following package for the slider to get the start and end time from the video:

“nouislider-react”: “³.4.1”

The ffmpeg command used:

ffmpeg -i input.mp4 -ss 00:05:10 -to 00:15:30 -acodec copy -vcodec copy out.mp4

The above command will take the input video input.mp4, and cut it. The cut video will be from 00:05:10 to 00:15:30, resulting in 10 minutes and 20 seconds video.

  • -i => input
  • -ss => starting position
  • -to => end position
  • -acodec copy and -vcodec copy => copy the codec data without transcoding (which would incur a quality loss)

Code:

We are using WebAssembly to run ffmpeg, so we need to add some Cross-Origin headers to our app, for this create a file called setupProxy.js in your src directory or add the following in your server.js file.

https://gist.github.com/hiakku/d491e587bd5815812930e39d5758b286

The above will automatically add headers when we run our create react app.

In our App.js file:

  • Constructor: We create some state items to keep track of the current app state
  • useEffect & ffmpeg: When the component gets mounted, then we load in the Web Assembly code for the ffmpeg script, and the script is loaded as true. Once video get uploaed, we get the duration of the video using the onloadedmetadata function.
  • Return: Here is our UI for the page, we show the input field to upload video. Once the video gets uploaded, then we have a slider available with an onUpdate handler. You can drag the slider to select the max limit of 30 seconds video for any start and end time of the video. The star and end duration will be displayed in HH:MM:SS format. You can play the original video using the Play button, which calls the handlePlay function. With the click of the Trim button, handleTrim function gets called, then the original video gets trimmed to the given start and end time. The trimmed video will be shown in the new video player which you can play, and pause to check.

Initial View:

Initial View: ReactJs application

Video uploaded View:

Video Trimming: ReactJS Application

Slider Change View:

Video Trimming: Slider Change View
https://gist.github.com/hiakku/a7834427ff8e11b3ce7322a84238f02c

Run It!

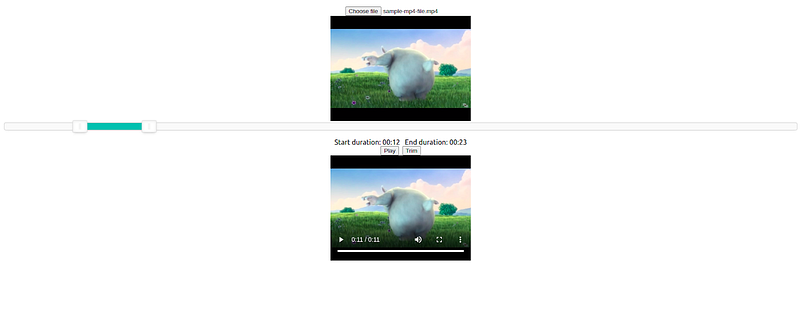
Now, you could test the application. Run npm start to start your react application and upload a video. You can play with the slider to set the range of the video and then trim it. It may take some seconds to update, you could check the ffmpeg progress log in the console. Once successful, you could use the trimmed URL obtained to upload to the server. You can view the entire project using this github link. This is just a starting point, you could transcode and reduce video quality to support lower bandwidth users, multiple resolutions, and so on!!

Final Output Without Slider Change!

Video Trimming: ReactJS Application

Final Output With Slider Change!

Video Trimming: ReactJS Application

References:

[embed]https://www.npmjs.com/package/nouislider-react[/embed]

Meet the team!

Author

Akanksha Yadav

Editor

Seema Jain


We at CaratLane are solving some of the most intriguing challenges to make our mark in the relatively uncharted omnichannel jewellery industry. If you are interested in tackling such obstacles, feel free to drop your updated resume/CV to careers@caratlane.com!
blog-img 2

Discussions

blog-img 3
5 mins
May 17, 2023
Sharing Data Between Controllers: Best Practices S...

This article will help you to understand the diffe

By Naveen C

blog-img 3
5 mins
March 21, 2023
Understanding Auto Layout and Constraints in Swift...

This article gives you an easy way of understandin

By Ramasamy P