

Video Editing in iOS using AV Foundation

By Ulaganathan Pv — “ The Inquisitive”
Video editing using AVFoundation is similar to using video editing software. Every video file will have two tracks in it, A Video track and an Audio track. We will focus only on the Video track for this blog since we are concentrating on adding visual elements.

To get the most out of this blog, you’ll need to be familiar with iOS Development and it is good if you have a good understanding of CALayers from CoreAnimation Framework.
Anyways throughout this blog, I’m providing links where you can learn more about the topics. I will explain what I’ve done with CALayers in this blog, you can explore the rest.
Coming back to the editing part, All the visual elements we are adding are going to be Layers to the video, So we will be using CALayers for it. Once all the Layers are added we will compose a new video using the video track where we have added new layers and the audio track which we left untouched. Create a unique URL path for the video and save it. (Saving it is optional, we can use the URL to access the video in other parts of the application).
Here we are going to explain only the video editing part and leave the rest to your creativity. We are going to use the UIImagePickerController so set up required delegates like UIImagePickerControllerDelegate and UINavigationControllerDelegate
For trimming the video we are going to use the UIImagePickerController, We have to set a limit for the video being used. Let us say we need to restrict the uploading video size to 10 seconds. For that, we are going to use the Image Picker’s videoMaximumDuration property. Setting this property will restrict the video selection/recording to a specified time limit.
Let us set up the ImagePicker with an action sheet for Recording/Selecting the video from the Photos application.
let alertController: UIAlertController = UIAlertController(title: "Pick an option", message: nil, preferredStyle: .actionSheet)
let cancelActionButton = UIAlertAction(title: "Cancel", style: .cancel) {
_ in
}
alertController.addAction(cancelActionButton)
let imageGalleryAction = UIAlertAction(title: "Choose from Gallery", style: .default)
{
    [weak self] _ in
self?.pickVideo(from: UIImagePickerController.SourceType.photoLibrary)
}
alertController.addAction(imageGalleryAction)
if UIImagePickerController.isSourceTypeAvailable(UIImagePickerController.SourceType.camera) {
let cameraAction = UIAlertAction(title: "Take a Video", style: .default)
    {
        [weak self]_ in
self?.pickVideo(from: UIImagePickerController.SourceType.camera)
    }

    alertController.addAction(cameraAction)
}
self.present(alertController, animated: true)
Let’s set up the UIImagePickerController. The below function will create an image picker object based on the source type selected from the action sheet.
private func pickVideo (from source: UIImagePickerController.SourceType) {
self.imagePicker = UIImagePickerController()
imagePicker.delegate = self
imagePicker.allowsEditing = true // 1
imagePicker.mediaTypes = ["public.movie"] // 2
imagePicker.videoMaximumDuration = TimeInterval(10.0) // 3
imagePicker.videoQuality = .typeHigh
imagePicker.sourceType = source
if source == UIImagePickerController.SourceType.camera {
imagePicker.cameraDevice = .front
}
present(imagePicker, animated: true)
}
In the above code snippet the line imagePicker.allowsEditing = true will enable the default editing options of the ImagePicker. Since we are trimming the video to a specific time limit we have set the videoMaximumDuration property. This line imagePicker.videoMaximumDuration = TimeInterval(10.0) in the code snippet will do that for us.
imagePicker.mediaTypes = [“public.movie”] This line will let us select only the videos from the Photos application.
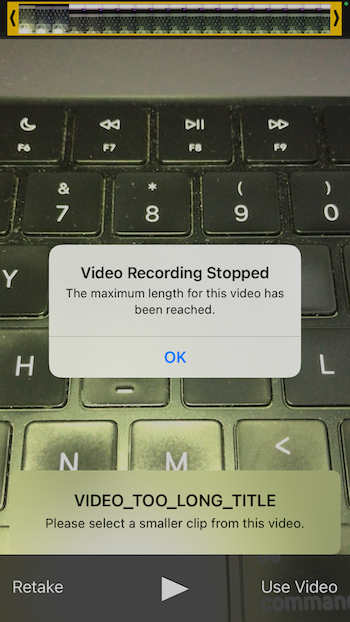
Now let us see how the trimming part works when you select a video from the Gallery ref(Image 2).
The slider at the top will help us navigate within the video file. The yellow marker over the slider fixes the time of 10 seconds we mentioned in the code.
Remember the property we set is “MaximumVideoDuration” So we can’t select a part of the video that exceeds 10 seconds. If you want to reduce the time duration you can drag the yellow markers right and left arrows to shorten the selection and move to a different timeline of the video.

Once select the Choose option from this view. You can access the shortened video through the UIImagePickerController Delegate. The below code will do that.
public func imagePickerController(_ picker: UIImagePickerController, didFinishPickingMediaWithInfo info: [UIImagePickerController.InfoKey : Any]) {
guard let url = info[.mediaURL] as? URL else {
return
    }

self.dismiss(animated: true) {
        [weak self] in
print(url)
// you can pass on this url of the video to do other stuff
    }
We are accessing the URL of the video here. Inside the completion block of the dismiss function I’m printing that. Now we will see how the trimming part works while recording a new video Ref(Image 2.1). Using the Yellow marker to further shorten and move to a different timeline.
Before adding a watermark to the video, we will go through the custom composition of the video. Let us create an AVURLAsset object and AVMutableComposition object. Then let us get the video track and audio track of the asset we are using. Add the video track and audio track to the composition object with a time range. Then using the AVVideoCompositionCoreAnimationTool we will create Core animation layers and add them to the video.
To compose a video we will need the video track and an audio track. Since we are not editing the video’s audio or visuals we are going to use the same tracks of the asset.
In the below code the commented line “3//” we are getting the video track of the asset we have selected using UIImagePicker and adding a mutable video track to the composition.
In line 4// we are creating a time range and adding it to the composition video track.
In line 5// we are getting the audio track of the selected asset and adding an audio track to the composition. Then inserting the time range for the audio track as we did for the video track
let queue = DispatchQueue.global(qos: .background)
        queue.async { [self] in
let asset = AVURLAsset(url: url) //1
let composition = AVMutableComposition() //2

guard
let compositionVideoTrack = composition.addMutableTrack(
                withMediaType: .video, preferredTrackID: kCMPersistentTrackID_Invalid),
let assetVideoTrack = asset.tracks(withMediaType: .video).first
else {
print("Something is wrong with the asset.")
                onComplete(nil, nil)
return
            } //3

do {
let timeRange = CMTimeRange(start: .zero, duration: asset.duration) //4
try compositionVideoTrack.insertTimeRange(timeRange, of: assetVideoTrack, at: .zero)
if let assetAudioTrack = asset.tracks(withMediaType: .audio).first,
let compositionAudioTrack = composition.addMutableTrack(
                  withMediaType: .audio,
                  preferredTrackID: kCMPersistentTrackID_Invalid) { //5
try compositionAudioTrack.insertTimeRange(
                  timeRange,
                  of: assetAudioTrack,
                  at: .zero)
              }
            } catch {
print(error)
                onComplete(nil, nil)
return
            }
Now let us set the orientation for the video.
compositionVideoTrack.preferredTransform = assetVideoTrack.preferredTransform
let videoInfo = orientation(from: assetVideoTrack.preferredTransform)
private func orientation(from transform: CGAffineTransform) -> (orientation: UIImage.Orientation, isPortrait: Bool) {
var assetOrientation = UIImage.Orientation.up
var isPortrait = false
if transform.a == 0 && transform.b == 1.0 && transform.c == -1.0 && transform.d == 0 {
assetOrientation = .right
isPortrait = true
}
else if transform.a == 0 && transform.b == -1.0 && transform.c == 1.0 && transform.d == 0 {
assetOrientation = .left
isPortrait = true
}
else if transform.a == 1.0 && transform.b == 0 && transform.c == 0 && transform.d == 1.0 {
assetOrientation = .up
}
else if transform.a == -1.0 && transform.b == 0 && transform.c == 0 && transform.d == -1.0 {
assetOrientation = .down
}
return (assetOrientation, isPortrait)
}Now let us get the video size, which will be useful to create the CoreAnimation layers.
In the below code we will create CALayers, where we will add our water mark.
https://gist.github.com/ulaganathan-PalaniVelayutham/38ef79ec7ac123fb6760de1795953660#file-videosize-gistfunc addWaterMarkImage (forLayer layer: CALayer, videoSize size: CGSize) {
let image = UIImage(named: "image that we use as watermark")!
let imageLayer = CALayer()
let aspect: CGFloat = image.size.width / image.size.height
let width = size.width * 0.15
let height = width / aspect
imageLayer.frame = CGRect(
x: size.width - (width + 30),
y: 30,
width: width,
height: height)
imageLayer.contents = image.cgImage
layer.addSublayer(imageLayer)
}Lets compose everything and export the output using an AVAssetExportSession
let videoComposition = AVMutableVideoComposition()
videoComposition.renderSize = videoSize
videoComposition.frameDuration = CMTime(value: 1, timescale: 30)
videoComposition.animationTool = AVVideoCompositionCoreAnimationTool(
    postProcessingAsVideoLayer: videoLayer,
    in: outputLayer)
let instruction = AVMutableVideoCompositionInstruction()
instruction.timeRange = CMTimeRange(
    start: .zero,
    duration: composition.duration)
videoComposition.instructions = [instruction]
let layerInstruction = self.compositionLayerInstruction(
    for: compositionVideoTrack,
    assetTrack: assetVideoTrack)
instruction.layerInstructions = [layerInstruction]
guard let export = AVAssetExportSession(
    asset: composition,
    presetName: AVAssetExportPresetHighestQuality)
else {
print("Cannot create export session.")
    onComplete(nil, nil)
return
}
let thumbnail = self.createThumbnailFromVideo(with: url)
let videoName = UUID().uuidString
let exportURL = URL(fileURLWithPath: NSTemporaryDirectory())
.appendingPathComponent(videoName)
.appendingPathExtension("mov")
export.videoComposition = videoComposition
export.outputFileType = .mov
export.outputURL = exportURL
export.exportAsynchronously {
DispatchQueue.main.async {
switch export.status {
case .completed:
            onComplete(exportURL)
default:
print("Something went wrong during export.")
print(export.error ?? "unknown error")
            onComplete(nil, nil)
break
        }
    }

}
When the export is completed on the completion block we are returning the Asset URL in the object “exportURL”. The video with the watermark will be available in the URL to access.
We have now added the watermark layer to our video. We have used the logo on the top as the watermark image. In part 2 of this blog, we will add animation layers or filters to the video.

Author: Ulaganathan Pv
Edited By: Seema Jain
We at CaratLane are solving some of the most intriguing challenges to make our mark in the relatively uncharted omnichannel jewellery industry. If you are interested in tackling such obstacles, feel free to drop your updated resume/CV to careers@caratlane.com!


Leave a Reply